Pages

Thursday, March 31, 2011

Mother's day!

We have been busy with our preparations for Mother's Day....

The children glued lollipop sticks together to make a flower shape. I added a skewer to make the stem.

In the meantime, I got my husband to cut round fence posts into one inch section. He also drilled a hole in the middle. The sections were then sanded - the children did some of it but I had to go over each one again to make sure there was no sharp edges (this was a great practical exercise for the kids and I am actually thinking about adding a "sanding" activity to my shelves!) I just glued little spring decorations I found at the bottom of a bag to make them more attractive.

Then the children painted their flowers.

They picked a bead for the centre of their flower. 

I added a little peg on the back of the flower. This will allow mammies to use the flower as photo holder or a post-it holder (if you know what I mean).

Finally, the children made little cards which we clipped onto the flowers. Et Voila!!! The job is done... Cute, aren't they? At first, as my husband was not finished with the fence posts, I used baby food jars for the support of the flower. The children filled them up with sand, glued a few beads on the jar and I added a pink felt scarf on the neck of the jar. They were quite impressive too. Sorry I don't have a photo of that version! I was under pressure to finish them and I completely forgot to take a picture.

Monday, March 28, 2011

A few Easter activities

I have put out new activities for Easter.

  1. The following one is a practical exercise.  I saw it on My Montessori Journey. The children pick up the eggs, open them and see if a little chick pops out. This help with their hand-eye coordination and improve their fine motor skills, as they have to find the way to open the eggs up and put them back together.


2. This activity is meant to reinforce the children's numeral reading and help them develop their counting skills. It goes from 1-10 but I am in the process of making another set for 11-20.


I printed some backgrounds and cut them out in the shape of an egg. Each egg is cut into halves.  I placed white stickers on one half. I wrote the corresponding number on the other half (from 1-10). I laminated all the pieces and I presented this little jigsaw to my son at first, who thought that was a brilliant game. Basically,  the children have to count how many stickers there are on one half and match it to the right number. I am going to make another set with numbers from 11-20.

Maria Montessori observed children would rather correct themselves than depend on an adult to do it for them. She believed that making mistakes was a natural part of learning and that developing self-correction skills helped develop confidence and decision-making skills. Therefore, the Montessori materials and presentations must contain a control of error which makes the child use his/her reasoning abilities. Here, once the child has matched 2 halves, he/she can control if he/she is right by turning the pieces over and see if the background is identical.

Friday, March 25, 2011

Pre-writing exercises in our classroom!

I just realised that I still haven't told you what type of pre-writing exercises we offer the children in our classroom.  The year is passing by so quick and the children have really progressed. So time for a bit of Montessori and educational theory (with the help of Maria Monessori!)


What do we do in class to prepare the children to writing?

Well, the first thing I need to mention is probably the series of exercises of Practical Life. These exercises help your child to strengthen his/herfinger muscles by tonging, tweezing, stringing, and twisting. The childrenare showed how to use their thumb and first two fingers while doing these activities  (the same fingers that hold a pencil).


When your child is painting, colouring, lacing or gluing (that is to say "crafting"), she/he is learning important writing skills too. The children learn to control their hand/eyr coordination. Even when the "marks" he/she makes on the page seem to be random, you soon get to realise that he is improving his movements as circles, legs, eyes etc.. start to appear. Scissors activities also provide pencil control.  

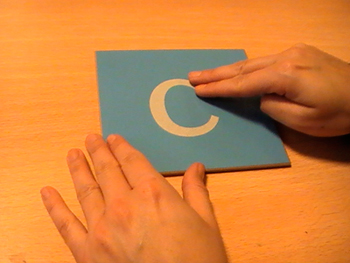
And of course, we have the sandpaper letters in our language corner. We guide the children's first two fingers along the letter, saying the sound. He/She feels the shape and repeats the sound. And in fact,  the first two fingers with which he traces the letters are the same two he uses when holding a pencil.


And how many traced shapes have they brought you home? The children use what we call Metal insets, designed by Maria Montessori to teach handwriting. These frames teach them to control their pencil because they act as  guides.  We show the children how to trace the insets and draw lines within the shapes, imitating strokes used in forming letters.


And I have also added a small dry erase board. It is a fun interactive way for the preschoolers to become familiar with writing.
To be ready for primary school, your child needs to know how to cut and paste, copy simple shapes, trace vertical and horizontal lines, trace his or her name, and hold crayons, pencils and scissors correctly.
All the activities I have mentioned above help them to build confidence until they are eventually ready to write their own names down. The dry erase board is very popular in the class and the children use it daily. I would write their name on the top and they would work at it. We don't expect perfection.  Learning to write is a fun process that must give children  a boost in confidence and solid foundation for future studies.


Last Christmas, when I was in France visiting my family, I came upon these dry erase books which help the kids to practice recognising and writing letters and numbers. It is a brilliant activity and they really like it too. So it was definitely worth a few euro!!


We do use worksheets too. However, I do not want to use them too much as I don't believe they are developmentally appropriate for preschool-age children. Why?  Worksheets don’t engage the whole child and tend to limit their fine motor development. I really think that if used too often, it becomes stifling for them. Don't take me wrong. I do use some now and again in the classroom. But only when the concept represented in the worksheet has been mastered by the child beforehand through hands-on experience with the Montessori materials mentioned above. I also think that it is a way to communicate to parents all that the child is learning. (We glue their worksheet in their work copy that they bring home at Christmas, Easter and in June). For more information on the pros and cons of using worksheets in preschool classrooms, click here.


Tuesday, March 22, 2011

Preparing for Easter!

In a bit more than 3 weeks, it will be Easter break... ALREADY! I can't believe how quick the weeks are passing by!  At the moment, I am preparing new activities in line with Easter. I have also rooted around for my decorations and also purchased new ones (I am always on the look out!). So, today, after class, I updated our interest table. The children will love it!

How cute is it?

And this is for my peace corner.. I am actually still working on it at the moment, so as soon as I am finished, I will talk about it at greater length.


Dressing Frames

Today, for some reasons, the children were all into the Montessori dressing frames. tha's the way it goes. One started.. and they all wanted to try! So here are some of the work they did:


Monday, March 21, 2011

Our schedule

Time is usually introduced to preschoolers as a sequence of events. So in our classroom, we have a schedule that visually illustrates the child's sequence of activities at preschool. I have created a card for each part of our session: putting their name on the board when they arrive, free play, tidy up time, cirle time, work time, snack time, outdoor play etc... Each time we change our activities, a child is designated to pin the appropriate card on our colourful magnetic board. Everytime it is time to move on to another sequence in our schedule, I ring a little bell and ask the children "what time is it?". They always know what comes next!  A child's capacity to learn about time increases as she/he becomes aware of how events recurring at specific times structure her/his days.


Our geography shelving unit


I recently purchased a new shelf for the classroom. I have now a proper geography corner for the children. It has been very popular and they love the continent maps. I have bought most of the Montessori maps. However, I do not want to overwhelm the children and I have only displayed 3 of them:

the world map with the 7 continent


the map of Asia

the map of Africa
 
When we start a new continent, I will add another map. However, I will never present more than 4 maps on the shelf as I think the children will get too confused. I know we are supposed to use the control maps to reconstruct each continent. ... But, I have to admit that I cheated a little bit by marking out each piece of the jigsaw onto the background in order to help the child connect the pieces together easier. And to be completely honest, I am learning with the kids!!! I have never been great at geography and I find it quite fascinating to sutdy with the children..
 
On the middle shelf, we have a memo game using flags of several countries around the world. We also have another memo game with pictures from France and from the UK. The children get to learn or hear words in a different language and they love repeating them out loud!


Sunday, March 20, 2011

Spring 3 part cards

We have been busy this week end, cleaning up our garden to welcome Spring! I love all the flowers we planted around.. A touch of colours here and there.. and voila! The garden looks like it is smiling! This gave me an idea. I want to teach the children at preschool to recognise flowers. So I created 3 part cards. It was my first time doing such a thing.. and I am delighted with the results.

Stefan was my guinea pig. I sat down with him and pointed at all the flowers, naming them. He repeated their names after me and matched each picture (piece of cake, Mam!)


Then Stefan had to pair the names of the flower.


I will introduce the cards tomorrow in class. I will let you know in a comment if the activity was popular among the kids. If you are interested in the cards, please leave a comment or send me an email and I will forward them to you.

Spring cutting activity


You know how much childen love using scissors.. Chop, chop, chop... Clap, clap, clap... This is such a popular activity in our classroom that I thought I would try to diversify it a little bit and make it a bit more fun. So, as Easter is coming soon now, I designed a document with pictures of chocolate bunny rabbits, Easter baskets, Easter eggs etc... The children will cut them out (either following the black line or cutting around the picture if they can) and then glue them onto colourful sheets of paper provided on the tray. Collage is definitely another great favourite here.. So I thought I would kill 2 birds with one stone!


If any of you are interested, leave a comment or send me an email, and I will forward you a copy.

Thursday, March 17, 2011

Our Solar System


I am going to go over a few activities we did before I created this blog. So here is the 1st one I want to share with you as it was very popular among the children.
 
Last January, we were studying the Solar system. Preschoolers are fascinated by that great wonder beyond the sky. Keeping in mind that that teaching the solar system to preschoolers is more about learning names and functions than it is about memorizing facts and statistics, I gave them an introduction to the concept, without an information overload. Just a few bits of information about each planet.
 
At circle time, using a poster of our solar system, we went through each single planet, singing our song on the "incy Wincy Spider" tune:
"Mercury and Venus, Planer Earth and Mars, Big Jupiter, Saturn and its rings, Uranus and Neptune, the last one is Pluto. These are the 9 planets that turn around the sun!" ( I know, I know. Technically, Pluto is not considered as a planet anymore,... But let's not compicate things, eh? Especially as it was still present on our poster).
 
I could have gone mad and made a mobile of our solar ytem with the kids but I thought it would end up being too complicated and time-consuming. So I googled a lot and I came up a good site with coloring pages,  Coloring Castle website. As imple as that. I  downloaded their coloring worksheet and made a sample for the kids to follow. First, they had to colour the planets in the right colour:
 
I helped them to cut the planets off. They then had to place them in the right order (starting with the closest planet to the sun), using the sample I provided them with.
 
Once they were done, they had to match the names of the planets ( a nice pre-reading exercise)!


It was a great exercise for them to practise their colouring skills and to improve their pre-literacy skills too.

Wednesday, March 16, 2011

Continent Swap


Over the past few weeks, I have been sharing, talking and emailing quite a number of very nice ladies all over the world who share the same passion for children, for early childhood education, for Montessori and for Waldorf. It is amazing to discover the amount of talent and ingenuity there is across the world when it comes to create new materials or set up new activities... Thank you all for opening up my horizons as a teacher...

In a previous post, I explained what a continent box was and its purpose. Creating them is a very large and time-consuming task but the children LOVE rooting through them. These boxes are definitely proper hand-on Montessori experiences (when technically, you can't bring the kids to each continent, you bring the continents to the kids..!!).

Well, I am so excited to say that I met a very friendly lady from the west coast of Canada who shares her adventures in Montessori, her wonderful resources and ideas and her cool crafting with the world. After several emails, we have decided to help each other build up our Continent boxes. It is so exciting to be part of this.. I read a lot about this system and it sounded like such a wonderful idea. Women across continents reaching out and helping one another!! It is so simple and yet so amazing!
We have decided to swap as we go along. Purely because it doesn't put any pressure on us this way! But many others have done it before us in a very structured way. Whenever I find something of interest regarding a continent, I email my new friend the details, and vice versa. This is going to save us so much time!


.

Tuesday, March 15, 2011

St Patrick's story

We were talking about St Patrick at circle time over the past few days. I had looked for good books to read to the children.
The Last Snake in Ireland: A story about Saint Patrick by Sheila McGill-Callaghan is my favourite. I used it as the background to my own version of the story: once St Patrick was rid of all the snakes, he realised there was one left. A wise old snake who refused to jump into the ocean with the rest of the group. St Patrick had to think for a while. He came up with a very clever trick indeed. He asked the snake to get into a box. The snake looked at the box and told St Patrick that there was no way he would fit into such a tight little box. The 2 of them kept arguing for a while until, tired of the fight, the old snake told St Patrick: "listen, I will prove you wrong. This box is too small. So look.. ". The snake got into the box. Before he could say anything, St Patrick had jumped on the box and closed the lid. The trick had worked. And he threw the box in the ocean... Ireland was rid of its very last snake for ever!!

St Patrick Activities

A bit of this and a bit of that for St Patrick's day.

  1. Making green cookies (looks like play doght when not cooked, don't they?)


2. Our shamrock


Monday, March 14, 2011

Pine cone feeder


I know it is spring but believe it or not bird feeding isn't just a winter activity; it is still freezing outside these days, which means that many insect populations haven’t emerged. So, basically, food is still scarce for our feathered friends.

This is an activity I meant to do during our winter month but for some reason, it never happened. So this week, as we talk about animals in Spring, I also remind the children of our garden friends. The children  made some bird feeders to bring home today. But I will make sure to make some for playschool too with my own kids to provide them with the opportunity to watch them and match them to a series of cards I have made myself (clap hands!). I have used actual photographs of birds visiting our playschool garden here in the South east of Ireland. These cards are a great identification guide for them. Each picture are labelled for pre-literacy purposes. 


Below are the photos of the children during our activity.

We are blessed here with the surroundings we live in: a rugged seashore with sandy beaches basically at our door step and a colourful site surrounded by big tall pine trees. Nothing else but  fresh air. An idyllic little spot to teach the children about nature! We have LOADS & LOADS of pine cones to pick up right at our feet. So we are using them to create our bird feeder. (Sorry the quality is not the best but I am waiting for my husband to buy me a new camera!!)


We collect that amount of  pine cones everyday..


Last year, I used peanut butter exclusively. Yet, this year, I have one child who has food allergies. For this reason, I used stork instead(vegetable oil fat) and it worked just as well!  And I have been told it is also better for birdies: peanut butter can get stuck in their gizzards, while butter provides lubrication!! You can also use lard.Clever!

So this is how we did it:


We tied some twine around the pine cone

Job done... Next ...

We buttered the stork all around the cone

Then we rolled the pine cone into our bowl full of feeds..

Et voilĂ !!