Saturday, April 30, 2011

A discovery garden - Part 1

We have had such wonderful weather here during our break! It felt a bit like summer... And this made me think about our outdoor facilities and what I really wanted to achieve. We have a wooden decking for the children to ride their bikes, cars and tractors on; gravel for them to dig and rake; grass for them to play around... We also have a swing. Great setting for plenty of physical exercise. But is this it?
No. I would like to have an outdoor playground open to discovery and  learning. First of all, I need to use gardening as a vehicle for encouraging children to make good food choices, for building a love of nature through experiential learning. I also would love for our playground to encourage children to be creative and to use their imagination as much as possible.

So I have worked hard in the garden this week (with the help of my husband. Thinking of it, he may have worked even harder than me!! Bless him). Describing everything would take too long so I have divided this topic into  several posts. This is the 1st one. 

Over the past 2 years, children were introduced to life cycle in our preschool when planting their own seeds. Once the seeds had germinated, the children could bring their little plants home. I want to do more with them and this is why this year we have planted lots of various seeds: running beans (see previous post), sunflowers, strawberries, pumpkins and courgettes. I looked after them over the last 2 weeks and they have grown so quickly on my window sills. I was amazed!


 I want the children to see their vegetables grow in the preschool garden, look after them and eventually bring home some of their harvest. I have planted those who were ready for the outdoor.  We will plant the rest of them together over the next few weeks.


I will teach the children the different parts of a plant/flower once we are back to work. And tomorrow, once I have taken a few more pictures, I will write part 2 and 3 and this post. Keep in touch!

Wednesday, April 27, 2011

New materials in our sensorial area

During our Easter break, I decided to extend our Montessori sensorial area and I have purchased new materials. I can't wait for the children to see them. Some of you might not be used to the Montessori method of Education... So here is a bit of theory for you.

The purpose and aim of Sensorial work is for the child to make classifications in his environment. Montessori believed that sensorial experiences began at birth. Through his senses, the child studies his environment and through his studies, the child  begins to understand the environment. The child is given the knowledge not through word of mouth, but through his own experiences. This is one of the key principles in the Montessori method. What I really love about the Montessori sensorial materials is that they isolate the one quality that is to be worked with by the child, allowing him/her to focus on that one quality. And of course, the materials all have a control of error, which allows the child to make the corrections himself/herself, teaching independence and problem solving.


The first thing I wanted to show you is the mystery bag with geometric solids. The Mystery Bag is simply a bag in which I place objects that the child cannot see. The child then uses his/her sense of touch to explore the object without removing it from the bag. During the first 2 trimestres, I used objects with different textures such as a sponge, a cork, a sea shell, a pine cones,  etc... The child would have to guess what it was and use terms such as smooth, rough, soft etc.. to describe what they were touching. When the children come back on May 3rd, I will use wooden geometric solids in the mystery bag to reinforce the children's knowledge of their names and characteristics.  


I also purchased the 4 Montessori sets of wooden  knobless cylinders. They are used to help children begin to understand the concept of dimension. The first set of cylinders varies in height and diameter with the tallest also being the thickest. The second also varies in height and diameter, but the tallest is the thinnest. The third set varies only in diameter, and the fourth only in height. These lessons are designed to teach coordination and grading by size.


I also added the Trinomial box beside our binomial box on the sensorial shelf. Children explore both boxes as sensorial activities of visual discrimination of color and form, preparing them indirectly for mathematics and algebra.


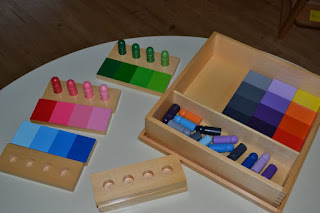
And I FINALLY bought the color grading material I had my eyes on over the past few months. This is such a lovely activity and I am sure it will be very popular amonf the kids. The sensorial materials in the Montessori classroom help the child to become aware of details by offering  at first, strongly contrasted sensations, such as red and blue. With this Color grading material, I can offer the children graded sensations, such as many different shades of blue or green or red.


I should really write a post about each areas in our classroom. I know I mentioned it before... Ok. That's definitely on my list then...

Friday, April 22, 2011

More pre-reading activities/games

Though I believe firmly in the Montessori method of education, I know it is very important to present the 3-4 year old children with  several pre-reading activity before introducing them to any Montessori Language materials. These "pre-reading" activities can be completed without any knowledge or understanding of the letter/sound relationship. The photos below show four of the "pre-reading" activities that I have placed on my "first" language shelf.


This photo shows a set of "go-together" matching cards.  Go-togethers games are considered pre-reading activities because they require children to think carefully about how things are connected to each other. When they willlearn to read in primary school, they will have to have a strong sense of what goes together: for instance, the sound /b/ goes with te letter "b" or /b/ goes with the word "banana". Not that easy when you think of it! In that sense, opposite matching cards (see 2nd photo below) are also a pre-reading game because the children have to analyze what is different but related at the same time. This is a very important type of comprehension activity for them.


The third photo below shows a set of part-whole cards. It is quite populr among the young kids because it represent some of their favourite TV characters.  What do they have to do? They have to take a part of a body ( a head, a tummy or a pair of feet) and match them to its related parts. This game introduces the relationship that exists between a "part" and "the whole". This is a mathematical concept but it is also important in reading and writing. When a child reads, he/she has to understand that letters are parts of a word, words are parts of a sentence etc... 


Sequencing is the ability to put the events of a story in the order in which they occurred. “Teaching sequencing to early learners is important because logical order of thinking is fundamental to reading and everyday life," says  Brenda Strickland, author of  Year Round reading. So sequencing is a  pre-reading skill that preschoolers can practice with the activity shown below:


For some children, sequencing can be a hard concept to grasp, especially when they are trying to tell a story. Using good key words like "first," "next," "then," and "finally," we cue the child as to what is coming next.

Using names for pre-reading activities

As I read somewhere before (sorry, I can’t find the source of the quotation!), “much of a child's initial understanding of words, letters, and sounds is tied to the word that means the most to them...........their own name!”. Many phonetic and phonological skills can actually be introduced using names and this is why we put such an emphasis on names at an early start. I thought it would be a good idea to show you how we do it in our preschool.

All parents are aware that we put a strong emphasis on name recognition from the minute they step into the preschool, as the first thing they see is the children’s hangers labelled with their name.


For smaller kids, it is a picture with their name below it. Children love having their own pictures as it recognises their individuality and made them feel like they belong at the same time. 

Parents would also know that we ask the children to pick their name among others and put it on the green board as they come in the classroom. Again, the younger kids would first recognise the picture before the name itself. After a few months, however, they usually have become so familiar with their name tag that they do not need the picture anymore.


Each  September, I take a close-up photo of each child's face. I glue the appropriate name on each photo and place it beside the picture representing the month they were born in as shown below (I am sorry for the poor quality of the photo. I couldn't do a close up... I have to protect the privacy of each child in our preschool):


We also have a game they are really fond of: the “Name game”. We all sit in a circle at circle time or before going outside. I pick a card with a name of it and hold it up. When a child sees his/her name, he/she stands up. Once we have done everybody’s name, we stand up and walk in circle slowly, singing “will you meet a friend of mine, will you meet a friend of mine, will you meet a friend of mine? This is my friend _____” (sung to the tune of “Mary had a little lamb”). At that point I throw a name card into the middle of the circle.  The child whose name it is grabs the card and returns to his/her place in the circle.  We keep going until all the children have had a go.  They LOVE this game!! It involves them and boost their sense of belonging.

I have a few more activities to talk about but I have to take more pictures first. Keep in touch.

Monday, April 18, 2011

Diary of a little seed- Part 1

Just before the children went on holiday, they planted some runner bean seeds. I told them that when they came back the seed would have grown into a little plant for them to bring home and care for. Although I am planning more planting with them in May, I wanted to create a little “seed diary” for them to watch. I got the idea from the wonderful site Playful Learning. Its author, Mariah Bruehl described how she and her girls took photos of an Amaryllis bulb every day to document its growth and changes. They made a video diary of the bulb’s life and I thought it was an excellent teaching method. So, I am going to try to do the same with our seeds. This is how far we are at the moment:


Wednesday 13th April

Sunday 17th April

Monday 18th April

I found it fascinating to see the little seed bringing forth to life, taking root and flourishing. It is also a great way to introduce the children to the cycle of life.  I will definitely post our little video later on. So keep in touch!

I am growing up..

A few months ago, as part of out "All about me" theme, I decided to measure up each child in my classroom. I found a piece of wood, sanded it and nailed it to the wall in the entrance for everybody to see. The children ABSOLUTELY loved this activity. We compared, measured, and talked about sizes and age. It just struck me this morning when I saw our height chart that it was high time for us to take new measurements for the kids to physically see how much they have grown in a couple of months. So, this is one of the first things we will do when we are back from our Easter break.


The 5 senses

I found this great photographic card game for the children to help them learn about their senses. My son Stefan (aged four and a half) thought it was quite good and spent ages playing with it, when I was working in the classroom today.


So this is definitely going on my shelves in the nature corner for the childre to explore and learn together when they are back after their Easter break.

Wednesday, April 13, 2011

Crafts for Easter

To celebrate Easter, the children made little Easter baskets today.
I used a hard white card sheet to make squares. The children dabbed their fingerprints into yellow, pink and green paint and then onto the white sheet. I then cut the sheet as seen below:


We then got some colourful nylon laces and plaited it to create the handle of the basket.  Add a bit of green crepe paper cut up in stripes, a few chocolate eggs as a treat and a cute little chick! Et Voilà!!


And we also made some very special rabbit ears.. just for fun! And a bit of face painting too to celebrate Easter.


Enjoy your Easter holidays everyone!

Tuesday, April 12, 2011

Gardening Time

Today was time for planting! I had been promising the children we would do it this week and was I glad the weather was so favourable to outdoor activities!! So out we went in the fresh air. Gardening encourage children to experiment and learn, to build a love of nature and stimulate their social interactions as they compare, describe and show each other what they are doing or what they can see.

Today, we started with planting runner bean seeds. They will be able to bringtheir little plant  home in about 2 weeks and watch grow and grow and grow. I gathered glass jars and clear plastic yogurt pots for the children to fill with soil. Each jar was carefully labelled with their respective name.


A bit of good old Irish soil.. Ready? steady? GO!


They were so focused on what they were doing. I love doing this activity with them! It is so rewarding. And there is more on the way as I am preparing a little patch for them to plant flowers, sunflowers, gourds and pumpkins. We will grow them inside first and then transplant them outside. But this is another story. Keep in touch!

Friday, April 8, 2011

Easter tree

Here is our Easter tree. We made it together yesterday. Kids were so excited:

Thursday, April 7, 2011

Weather in April Booklet

Following our study on "rain clouds", the children prepared a little booklet about the weather in April. I saw a post on something similar in The Moveable Alphabet and I thought it would be a nice addition to our learning. So, here it goes:


Tuesday, April 5, 2011

Easter Patterns

Today, the kids were working on making patterns. All the photos below are quite self explanatory:


Monday, April 4, 2011

More writing exercises

Maria Montessori was a big advocate of teaching writing before reading. And this make sense when you think about it. This " makes perfect sense when you consider that the process of writing is encoding, a process much less complicated than decoding, which reading necessitates. The children learn the sounds of the English language and their corresponding symbols, and soon learn that they can put these together to make words. Later on, they have what is often called an "explosion" into reading. They know all the sounds, understand concretely what it means to put letters together to make words, and for this reason are quite well-prepared for reading, and as soon as they realize that they have what it takes, generally take to it quite easily" (Melissa Joanne, Diary of a Montessori Teacher )

Our writing activities extend throughout much of the curriculum as I mentioned it in our previous post on writing. Yet, I am always on the look out for new exercises and new ideas to encourage the children to write.

Therefore, today I showed them how to write their name in the sand. It is a great practice for them. I had presented this exercise earlier on in the year but I soon realised they were not ready for it. They were still  learning to recognise their names among many others and they were not that interested back then. But this time, it was a success.


I had a brainstorming session over the week end and I came up with another "amusing" way for the children to keep practising at writing their names.


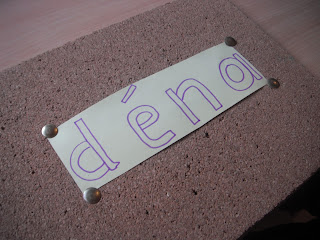
I wrote their names down in big letters and pin them down on a cork board.

I wrapped a big sewing needle up with cellor tape so that their little fingers wouldn't slip on it when using it to dot the letters of their names.

This is the final result! I didn't expect them to be so keen on doing this exercise.. but they were actually queuing for it!! Imagine this! They kept asking :"when is it my turn to do my own name?". Which of course prompted a conversation between them as they queued: it takes longer to say my name than your name", or " I like my name, do you like your name?It was so interesting to listen to them. And the pride showing on their face upon completing the exercise was priceless! I am already working on new ideas slightly diverging from this presentation. Just wait and see..