Saturday, March 10, 2012

Springtime at our doorsteps!

In France, we were thaught that Spring arrives on March 21st... Well, Irish people diagree with me and every year, they argue with me that spring starts on Februay 1st!!! Scientists would say that  it is springtime in March in the northern hemosphere, on the 21st, at the Spring Equinox.  See, the Irish used to celebrate St Bridgid's Day  halfway between the Winter Solstice and the Spring Equinox. St Bridgid's festival was pagan and was observed in Gaelic Ireland during the Middle Ages, referring to Irish mythology. Many parents have come to the classroom dropping their kids and laughing at my stubborness: at circle time, I would keep repeating to the kids that it was still winter (thought their parents had told them otherwise!). Parent would tease me and kept joking that it must have been a French thing!!! Ha ha ha!! So, I struck a deal and we usually introduce the theme of Spring in our classroom around the beginning of March. So this is exactly what we are at this week!

The first thing I do is to update our season board (see my post on our winter board here) and put new posters and pictures all around the classroom.


Then we talk about all the changes that happen outside in our garden when Spring time arrives. And at the moment, we are focusing on the weather: wind, rain, rainbows etc.. This week, I wanted the children to learn bit more about rainbows.  I looked for the best way to explain them how a rainbow happens and I thought of a few science experiments to do with them. I started by asking them "have you ever seen a rainbow in the sky?... Was it a rainy day?... What did it look like? ...Can you name the colours?". 

Reading books about rainbows is a way to begin your lesson. Here are a few suggested titles:
Rainbow and You, by Edwin C. Krupp
A Rainbow of My Own, by Don Freeman
We read Over the Rainbow by E.Y. Harburg. I love this book. It comes with a CD with one of my favourite songs "Over the rainbow". A beautiful rendition. It really touched my heart and those of the children. I read the book to the children wih music in the background (the book came with a CD). I asked them to close their eyes and to imagine they were flying on the rainbow. "What can you see now?", "where are you now?" etc... They ABSOLUTELY loved that exercise. It was so much fun. We then played the song "Over the rainbow" and I used the book to illustrate each verse of the song... I really loved this activity..
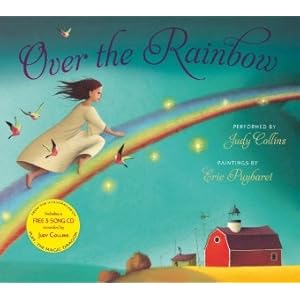
Over the Rainbow 

Then,  introduced the children with a little bit of background knowledge on the rainbow. Only a little bit. No need to go into details at their age. I explained them that a rainbow is a colored light we can see in the sky. And that light appears when the sun beams over falling raindrops. To demonstrate my point, I used a glass prism to show them what happens.


I also put a little mirror / glass prism in a glass filled with water and placed the glass by the window, playing with the light until we capture a rainbow in our classroom. I had given the children an empty small baby jar each and as I held the mirror in the glass, I told them to try to capture the rainbow in their jar.


I am sorry but I couldn't catch the rainbow when I took the picture! But the kids saw it!!

I am so sorry now that I didn't take another picture when they were trying to catch the rainbow! What fun!!! So much laughter!! Obviously, they got nothing. So I told them we were going to make our own rainbow. I had planned to dye some rice beforehand with food colourants for the children to pour layer by layer in a baby jar. Unfortunately, I heard that my granny had passed away in France and I had to leave everything behind (to the capable hands of my assistant Rachel) and flew home to be with my family...... Anyway, when I came back, as I had very little time left to finish our acitivities on rainbows, this is what I did: I had lots of wooden curtain rings in my house. I got them out, sprayed them all in white. I precut some colourful ribbons I also had in my "magic bag" and showed the children how to loop them around the rings.


I tied up up neatly and Voila!!!! The children seemed quite happy witht the results! I don't know if their parents understood what it was meant to be, but I am sure they told them!!! ..


I surely do hop that my Gran is flying on one of these beautiful rainbows now!!

Always in my heart, Mémé  .....


Tuesday, February 28, 2012

Welcome to our classroom!

A few days ago, Sasha at To The Lesson was asking me if I had any more picture of my classroom. I realised it was high time I updated my blog and today I went to take a few pics of what my preschool looks like at the moment.

This is what you first see when you pass the preschool front gate:


Here is our tiny tiny litlle hall when I welcome all my little children. You can't really see, but we have pegs all around the walls for the children to hang their coats and belongings.


This is what you see when you walk into the classroom:


On your left as you enter, you'll see our lietracy/language corner:


You wouldn't be able to see our art corner when you come in, but here it is, right behind you:


On your right (as you enter the classroom), we have our geography corner and the paractical exercise shelves:


Our jigsaw sehlving units faces the PLE corner:


Behind the jigsaw shelves, our little book corner and circle time area:


Here is another view of our book corner. See one of our sensorial shelves there too.


Our cultural/science area:


And our Maths corner:


I hope you like it!!!
As the classroom was initially built to fit in with the Montessori methhod of education, we don't have any role-play/fantasy corner. I personally believe that if I was to add such a little corner, it would benefit the children tremendously. The benefits of role play are endless but I think I will have to dedicate a full post on this topic. So until I can add an extra room to our classroom, what I do is work with boxes. I have a box for cars and small people, a box for dressing up and a box for pretend play with doctor set, tea set, teacher set etc... We don't make them available at all time but we use them to compliment or add to a theme, a story. And when it rains outside, we get the boxes out to have a bit more fun inside!!

Finally, here is our outdoor area... Keep in mind that we are just getting out of a long dull winter. Not much colour yet in the garden but that will change quickly. Just bear in mind that the trampoline is NEVER used by my preschoolers. Neither is the tree house. Too dangerous. But they have access to the rest of the garden. They even have access to our wooden decking with their tractors, their bikes and their cars. It is situated on the left hand side of the sand pit but I forgot to take a picture this afternoon!!! The children love the garden and they should be able to make the most of it as the good weater returns. I have also lots of little fun activities planned ... And I am hoping to add a few little crannie here and there to encourage oral language, role play and discoveries.  Keep in touch..


Sunday, February 26, 2012

Ladybird counting game

You all know by now how much I like to create new activities for my little ones.. Keep them interested and challenged. So I came up with this little math activity. Nothing extraordinary but I am quite pleased with it. On Friday, we were outside and one of my students came running up to me excitedly, carrying a little ladybird in her hand and shouted: "the ladybird is awake.. she 's awake... She is not hibernated anymore!!". All the kids gathered arounfd her to look at it and went all around the garden to see if they could find anymore. They were not very lucky in their hunt, alas! However, this gave me the idea for my math activity. A nice way to tie everything together! So here is what I did:

First, I made some numeral cards: I used green for odd numbers and yellow for even numbers. I used a spongy/foamy type of paper.


I laminated 10 ladybird templates I found in my "drawer of things to keep" (which basically mean, "my messy drawer where I put everything when I don't know wherelse to put them!!") and cut them out once they were laninated.


I used 55 black buttons as counters and voila!!


First the child takes the ladybird out of the tray and is shown how to lay hem horizontally, one fater one, from let to right at the top of the mat (by the way, we did the exercise at the table first, but I would strongly recomend to do it on the floor as it takes a LOT of space!).


The child then lays the number cards randomly on the mat and must pick the numbers in sequence from 1-10, laying number 1 on top of the first ladybird, on the left. The child keeps going in this fashion until all the number cards have been placed orderly. The teacher should encourage the child to learn his odinal numbers at that stage, by saying for insatnce: "what comes after 2?". The child says 3 and the teacher asks him to place it on the "third " ladybird etc.. This is a great way to either introduce or reinforce the child's knowledgeof ordinal numbers.


       Then, the teacher places the basket in front of the child and asks him how many counters the 1st card should get. The chld says 1 and places 1 counter on the left wing of the ladybird. She then asks the child how many counters should go on the 2nd ladybird. The child places 2 counters: on on the left wing, and another on the right wing.

       When the exercise is finihed, I would remind the child of what an odd and an even number is and point at the pattern of the counters. The odd number have no partner at the end of the row but the even number numbers do. I would also point at the different colours used for this exercise.

      I am very pleased with the activity. It is base don the cards and counters material designed by Montessori but with a little twist, which I think will attract the children and bring them back to the task again and again.... As i said above, nothing you haven't seen.. nothing extraordinary.. but it is so satisfying to create your own materials!!!!!!

Sunday, February 12, 2012

Caution: Floor mats in use here!!!

Here is what went on this week in our classroom. A bit of this and a bit of that....

Remember my recent post in our literacy activities? Well, here are a  few pictures of the children in action with the sound booklets, the sandpaper letters and objects and the sandpaper letters witht pictures:


I found these exercises so beneficial to the children. We always revise our sounds at circle time and introduce new ones too. Of course, this go hand in hand with the sandpaper letters during individual lessons. However, I have found that, taken out of these 2 contexts, if some children are asked to recognise a sound, they are lost. Practising their sounds this way was so enticing and they really liked it. It helped a few of them to make the association between a word, its initial sound and the written sound. I am really glad I spent so much time making the booklets and looking for objects around my house for our box (believe me, it was probably the hardest part.. though my own kids thought it was fun... LIke a scavenger hunt inside the house!)

What else did we do?


Punching and gluing


Tracing, colouring and cutting exercise


Jigsaws


More jigsaws


The above photo shows how the children are using our floor mats in the classroom. To be honest, over the past 2 weeks, I have been reminding the children of the importance of working with their mats (either on the floor or at the table). This was a principle of the Montessori method we had gone over at the beginning of the year but some children had either completely forgotten the rules and forgot to use the mats altogether or they were not using them appropriately (e.g:  carrying their work and mat separately). So, I reintroduced the lesson on the use of mats in our classroom. The mats provide children with a delineated work space of their own where they can work. I explained again to the children that a mat represents their own space of work. Nobody can interfere with their work on the mat, touch it or alter it. Children have to learn and show respect for their peers’ work. Basically, the purpose of the mats is to reinforce Montessori's principle of "freedom within limits". I showed them how to walk around the mats and how to place their work on the mats. They were reminded that (as I said above), they are not allowed to join a classmates’ work unless they have be given permission by that child. The children have been more careful thanks to these reminders and you know what… their work and concentration have already improved so much.. Why didn’t I do this before?

Thursday, February 9, 2012

Will you be my Valentine?

Yes, it's Valentine's. And I have been so un-organised!! I haven't been able to get motivated and to ne honest, when I went looking for little hearts and items like this for our Practical Life exercises, I simply couldn't find anything!! What a shame.. If I had given myself enought time, I probably would have found enough gadgets.... Never mind!! I'll make it up for Patrick's Day!!!
However, the children have been working on a little Valentine offering for their mam or Dad (or both).. I basically reproduced the activity we did last year (you can see right here).

Instead of using chick peas, I decided to use some wooden coloured beads. The children couldn't use them for lacing activites as they were badly shaped. So they were there, in the cupboard and I thought it would be a nice way to recycle them.


Now, the plan is for us to paint them in red. I couldn't make up my mind so I let the children decide. So here are the 2 final versions of the craft.


If you don't have any wooden beads or chick peas, why not using coffee beans? We ran out of beads and my assistant Rachel came up with this rescue solution!! Not bad, hey? (sorry I don't have a photo of the painted version!)


Wednesday, February 8, 2012

Unispiring geometric solids? Not anymore!!

I must admit that our Geometric Solids have been rarely used in our classroom, probably because it didn't inspire the children.  The children have been introduced to the names of each solids but this is not a popular activity. I had been thinking about extending the exercise but never gor around it until I finally got onto   Montessori for Everyone and downloaded a set of matching cards to be used in conjunction with the geometric solids.  The set of cards depicts each of the Geometric Solids with several corresponding photos for each shape. The photos represent objects in the child’s environment/community. I made a set of 10 labelled geometric solid cards to be placed under each solid and a set of 30 picture cards for sorting. I placed them all in a basket, right beside the geometric solids on our sensorial shelves. The child will be asked to first match the geometric solid cards to the solids. Then, he picks the set of picture cards and places each one of them under their corresponding solid.

Picture borrows from Montessori Albums


The first thing I do is to bring a child to the sensorial shelves and tell him/her that I am going to show him/her how to work with a new piece of material.

  1.   I use the work cycle to present the exercise
  2. At the start of the lesson, we first place the solids horizontally from left to right on the top of the mat.  I then re-introduce the names of the solids. As I go over each name, I point at the name labelled on the cards.  
  3.  I introduce the matching Geometric Solid cards and show the child how to match them to the solids.


  4. Once the child is successful with the first set of cards, I then invite her to sort the remaining picture cards underneath.  Everytimethe child places a card underneath a solid card,   I ask her/him why she/he does so, enticing her/him to think about the shape and its characteristics. Once child placed the tent under the rectangular prism and when asked why, he said: “well, it has a rectangle shape here and a triangle shape here. And I have slept in a tent before with my Mam and Dad, so I know”.  This comment spurred a flow of other comments from the children who eagerly shared their own experience.


Once the exercise is completed, I show the child how she could turn the cards around and check for herself if her work was correct. Each card is colour-coded for control of error. I then show her how to tidy up the picture cards first from left to right, row by row. Then we pick up the labelled geometric cards from left to right. We place all the cards back in their basket. We then pick up all the solids from left to right and place them all in their basket. Both baskets are then returned to the sensorial shelves.  


I have to admit, this is not a table top activity and I should have presented the exercise on the floor. There is always room for improvement!!! All in all though, I found this activity absolutely brilliant for several reasons:
  • During one of my many  presentations, many children gathered up around Millie ( 4 years old) and myself. I was surprised with the visual impact the cards created once they were all laid out with the Geometric Solids.  In fact, throughout the lesson, several children in the classroom came to see what the "new work" was and I heard more remark, "Oooh, what's that?  I want to do that!"  It was heartening to see a new interest develop in the Geometric Solids sparked by this set.
  • Children may make several observations about this work. This activity was brilliant to begin discussions.  First of all, the children realised quickly that certain shapes are much more likely to occur in nature (ellipsoids) while others are much more likely to occur in human made construction (pyramids). And the ones made by men are much harder to find than the others. It was wonderful to see the children speculate as to why that is, and brainstorm about other examples of each of these types of solids.
  •  The children’s range of vocabulary as we revised the names of all the solids and compared them to their day-to-day usage. For instance, people commonly refer to any structure that starts broadly and ends narrowly as a pyramid (a child’s tower of blocks, for example).
  • The children know to spot the differences between a square-based pyramid and a triangular pyramid. It got the children to look at the details of each shape more carefully by comparing and matching. So if you want to stimulates your children’s awareness of geometric shapes, this is the way to go!
  • The activity  introduces them to mathematical concepts (geometry)
  • And believe it or not, but the whole exercise indirectly introduces children to art appreciation as they learn about the specific characteristics of each solid.
Ok... as I am studying like mad at the moment for my Montessori Degree, I decided to link this activity to theory. So, you may want to quit the reading of this post right here as it is going to get a bit "boring" for some of you!!! But believe me, it is a great practising exercise for me. So just bear with me!!

"Teachers in general are continually looking for ways to guide students’ understanding of mathematical concepts. Contemporary research has demonstrated that pre-schoolers need opportunities to explore their world and experience mathematics. There are 3  fundamental mathematical concepts that form the building blocks of mathematical and scientific knowledge: matching, classification, order & seriation.  The development of these concepts allows the children to organize and categorize information so that when they start formal schooling, they begin to apply fundamental concepts by exploring ideas both in maths and science (Charlesworth and Lind, 1999). The constructivist paradigm based on Piaget’s (1955) theory of cognitive development has long provided a framework for  educational practices in which children gain concepts trough involvement with the environment and construct their knowledge as they explore their surroundings. This means using manipulative materials that enable children to engage in active learning. Using pictures of objects that can be found in the children’s everyday life gives them the right experience in assessing the different characteristics of the solids and help the children to place them in their environment.

Also, having a print rich, or literacy rich environment is an important aspect of a child’s literacy education. According to one study, exposure to written language helps children develop a number of things including: awareness of print, phonemic awareness, letter naming, listening comprehension and eventually word reading. (Gunn, Simmons, & Kameenui, 1995, 3). Marie Clay (Teale & Sulzby, 1986) was the first person to introduce the term emergent literacy to describe the behaviors used by young children with books and printed words, even though the children could not actually read and write in the conventional sense. Mary Clay suggests that literacy development begins way before children start formal instruction in elementary school (Teale & Sulzby, 1986). Children have been found to learn about written language as they actively engage with adults in reading and writing situations; as they explore print on their own; and as they observe others around them engaged in literacy activities (Teale & Sulzby, 1986). For example, when hearing me say the word “ellipsoid” a few times and pointing at the printed word at the same time, the children are not just memorizing the word, but actually learning that printed words carry a meaning. And this is why labelling is very important. In a Montessori environment,  we use lots of nomenclatures and 3 part-cards with words printed on the cards. Just like in this activity. Repetition will provide experience for the children and help them associate the printed word with its meaning or what it represents."

 I hope I make sense!